

Store-bought treats are convenient, but nothing says ‘I love you’ like a warm snack made just for your furry best friend. In a world of complex ingredient lists and confusing labels, creating your own homemade dog treats puts you in complete control. You know exactly what’s going into them, meaning no mysterious fillers, artificial preservatives, or unsafe additives. This approach is a fantastic way to cater to your dog’s specific dietary needs, whether they have food allergies, a sensitive stomach, or are simply a picky eater.
Baking for your pup is also a budget-friendly alternative that doesn’t compromise on quality. You can easily tailor flavors to your dog’s preferences, ensuring every bite is a tail-wagging success. Plus, the process itself is a rewarding way to bond with your companion.
This guide provides seven vet-approved and pup-tested homemade dog treats recipes that are simple, wholesome, and delicious. We’ll cover everything from crunchy biscuits to refreshing frozen bites, giving you a variety of options for training, rewards, or special occasions. Get ready to preheat your oven and fill your home with an aroma your dog will find irresistible. Let’s get baking.
1. Peanut Butter & Banana Dog Biscuits
This classic recipe is a perfect starting point for anyone new to making homemade dog treats. Combining the rich, nutty flavor of peanut butter with the natural sweetness of ripe bananas, these biscuits are a favorite among canines and their owners alike. The use of simple, whole-food ingredients like whole wheat flour and oats provides a nutritious snack packed with protein, potassium, and fiber.
The appeal of this recipe lies in its simplicity and reliability. It requires only a few pantry staples, making it an accessible and budget-friendly option. As a testament to its popularity, you can find variations of this recipe featured in BarkBox’s treat-making series and earning thousands of positive reviews on platforms like AllRecipes. Its balanced nutritional profile and delicious taste have even made it a go-to reward for professional trainers, including those at PetSmart.
Actionable Tips for Perfect Biscuits
To ensure your Peanut Butter & Banana Dog Biscuits turn out perfectly every time, follow these specific tips:
- Safety First: Always use a peanut butter that is free of xylitol, an artificial sweetener that is highly toxic to dogs. Check the ingredient label carefully before you begin.
- Banana Selection: Opt for overripe bananas, the kind with brown spots on the peel. They are naturally sweeter and much easier to mash into a smooth consistency, which helps bind the dough.
- Texture Control: The thickness of your rolled dough determines the final texture. For a crunchy, crisp biscuit, roll the dough to about a 1/4-inch thickness. For a chewier, softer treat, aim for a 1/2-inch thickness.
The following summary box offers a quick reference on key data points for this recipe.
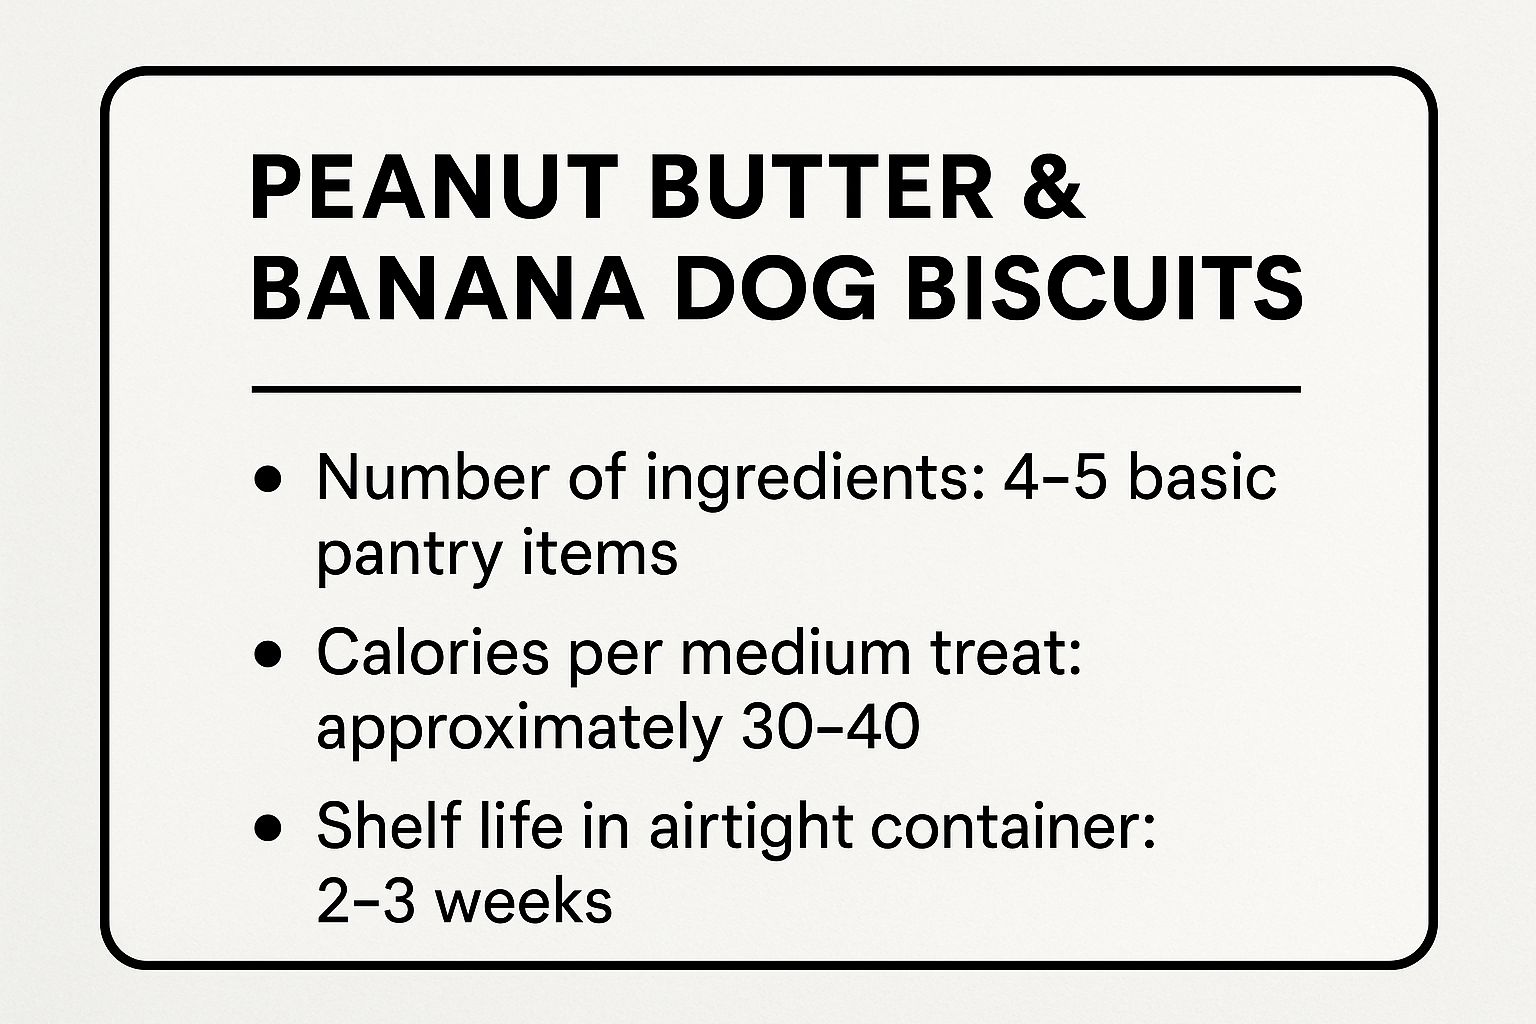
This data highlights the recipe’s efficiency with minimal ingredients and a good shelf life, making it a practical choice for busy pet owners.
Storing for Freshness
Proper storage is crucial for extending the life of your homemade treats. For short-term storage, keep the biscuits in an airtight container at room temperature for up to one week. To maintain freshness for longer, store them in the refrigerator for up to four weeks. You can also freeze a large batch in freezer-safe bags for up to three months, ensuring you always have a healthy snack on hand for your furry friend. Just like for humans, providing treats in moderation is part of an overall heart-healthy lifestyle for your dog.
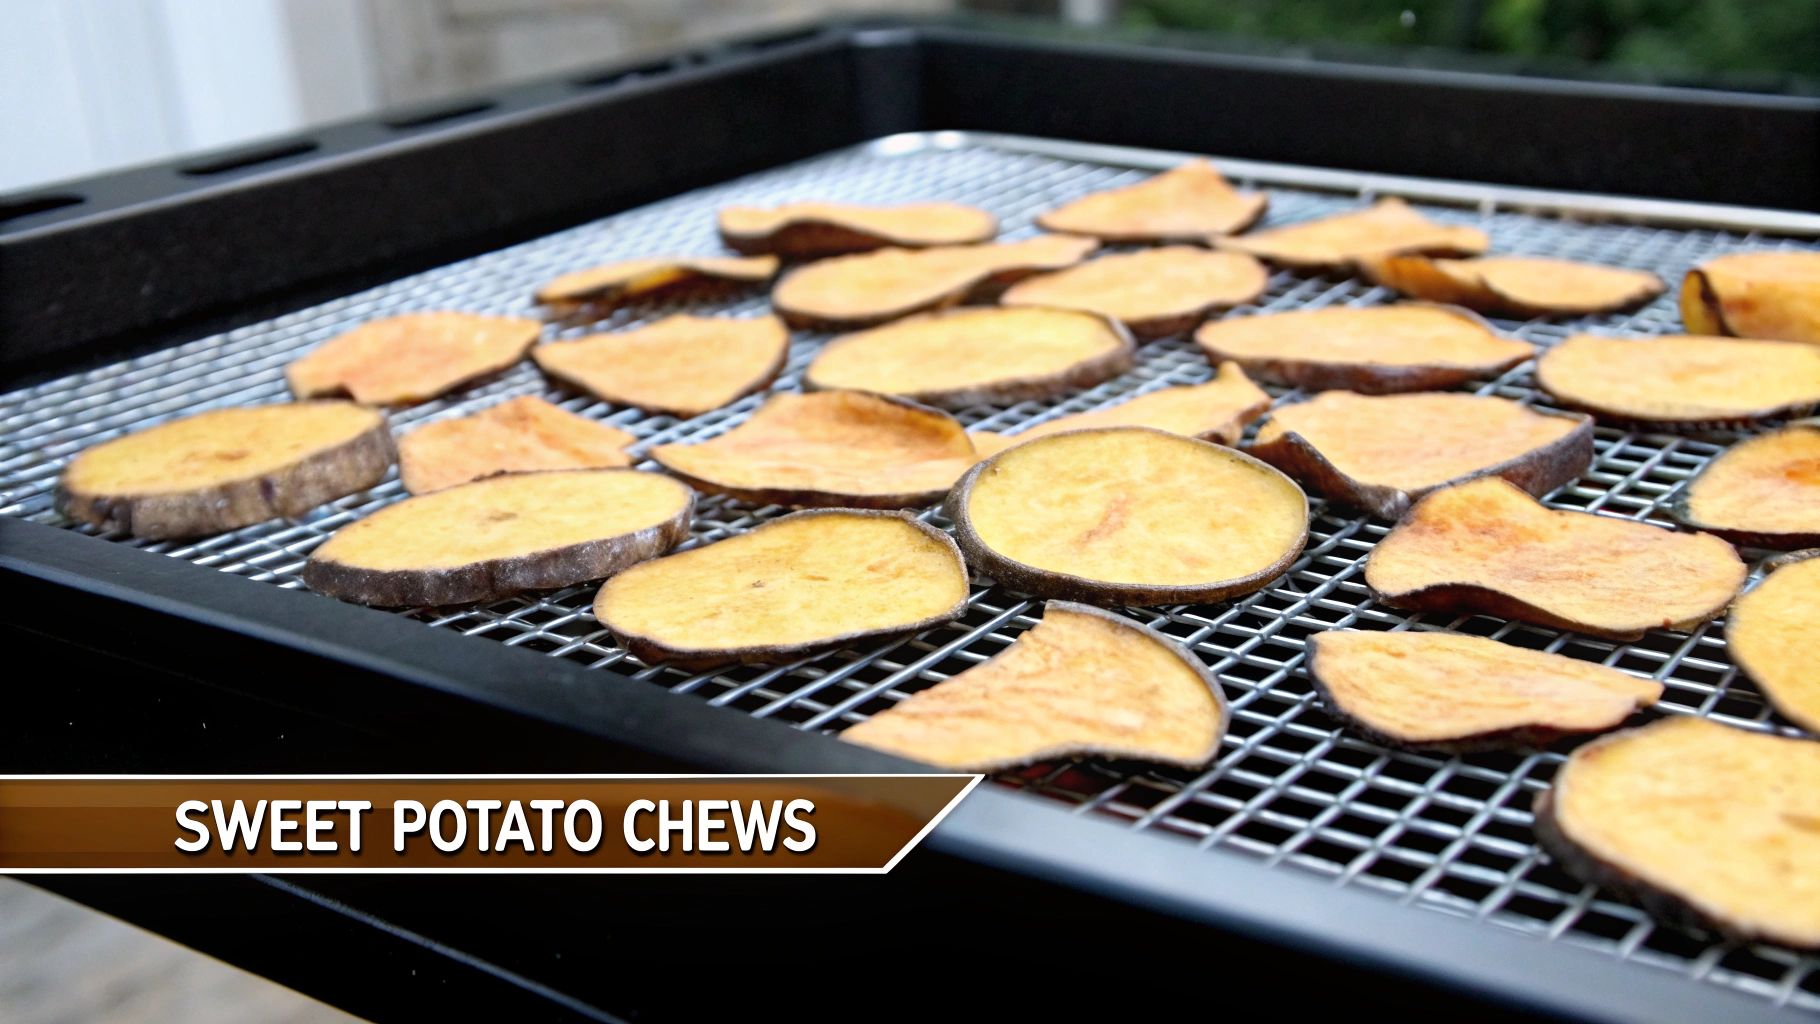
2. Sweet Potato Chews
This minimalist recipe creates a delicious and healthy treat using just one ingredient: the sweet potato. By thinly slicing and slowly baking or dehydrating them, you create chewy, naturally sweet strips that are perfect for dogs, especially those with food sensitivities or allergies. Sweet potatoes are a nutritional powerhouse, packed with vitamins A, C, and B6, as well as essential fiber and minerals. The slow-cooking process concentrates their natural flavor and creates a satisfying, leathery texture that can also help clean your dog’s teeth.
The single-ingredient nature of this recipe makes it exceptionally safe and easy to prepare. Its popularity has grown thanks to endorsements from holistic veterinarians like Dr. Karen Becker and its frequent appearance in publications like Dog Fancy magazine. Even popular brands like The Honest Kitchen and Wholesome Pride sell commercial versions, proving its widespread appeal. Renowned dog behaviorist Cesar Millan has also recommended similar chews as high-value training rewards.
Actionable Tips for Perfect Chews
To achieve the ideal chewy texture for your Sweet Potato Chews, follow these specific tips:
- Uniform Slicing: Use a mandoline slicer to cut the sweet potato lengthwise into uniform 1/4-inch thick slices. This consistency is crucial for even cooking and achieving the perfect chewiness.
- Preparation is Key: Before baking, thoroughly wash and pat the sweet potato slices completely dry with a paper towel. Removing excess surface moisture significantly reduces baking time and helps create a better texture.
- Low and Slow: Bake the slices in a single layer on a baking sheet at a low temperature, around 250°F (120°C), for about 3 hours. Be sure to flip them halfway through to ensure they dry out evenly on both sides.
Storing for Freshness
Proper storage is vital to prevent these chews from becoming moldy. Once completely cooled, store the sweet potato chews in a paper bag or a container that is not completely airtight. This allows for slight air circulation, which helps prevent moisture buildup. For short-term storage, keep them in a cool, dark pantry for up to three weeks. For longer-lasting freshness, you can store them in an airtight container in the refrigerator for up to a month. As with any treat, moderation is key to maintaining your dog’s balanced diet.
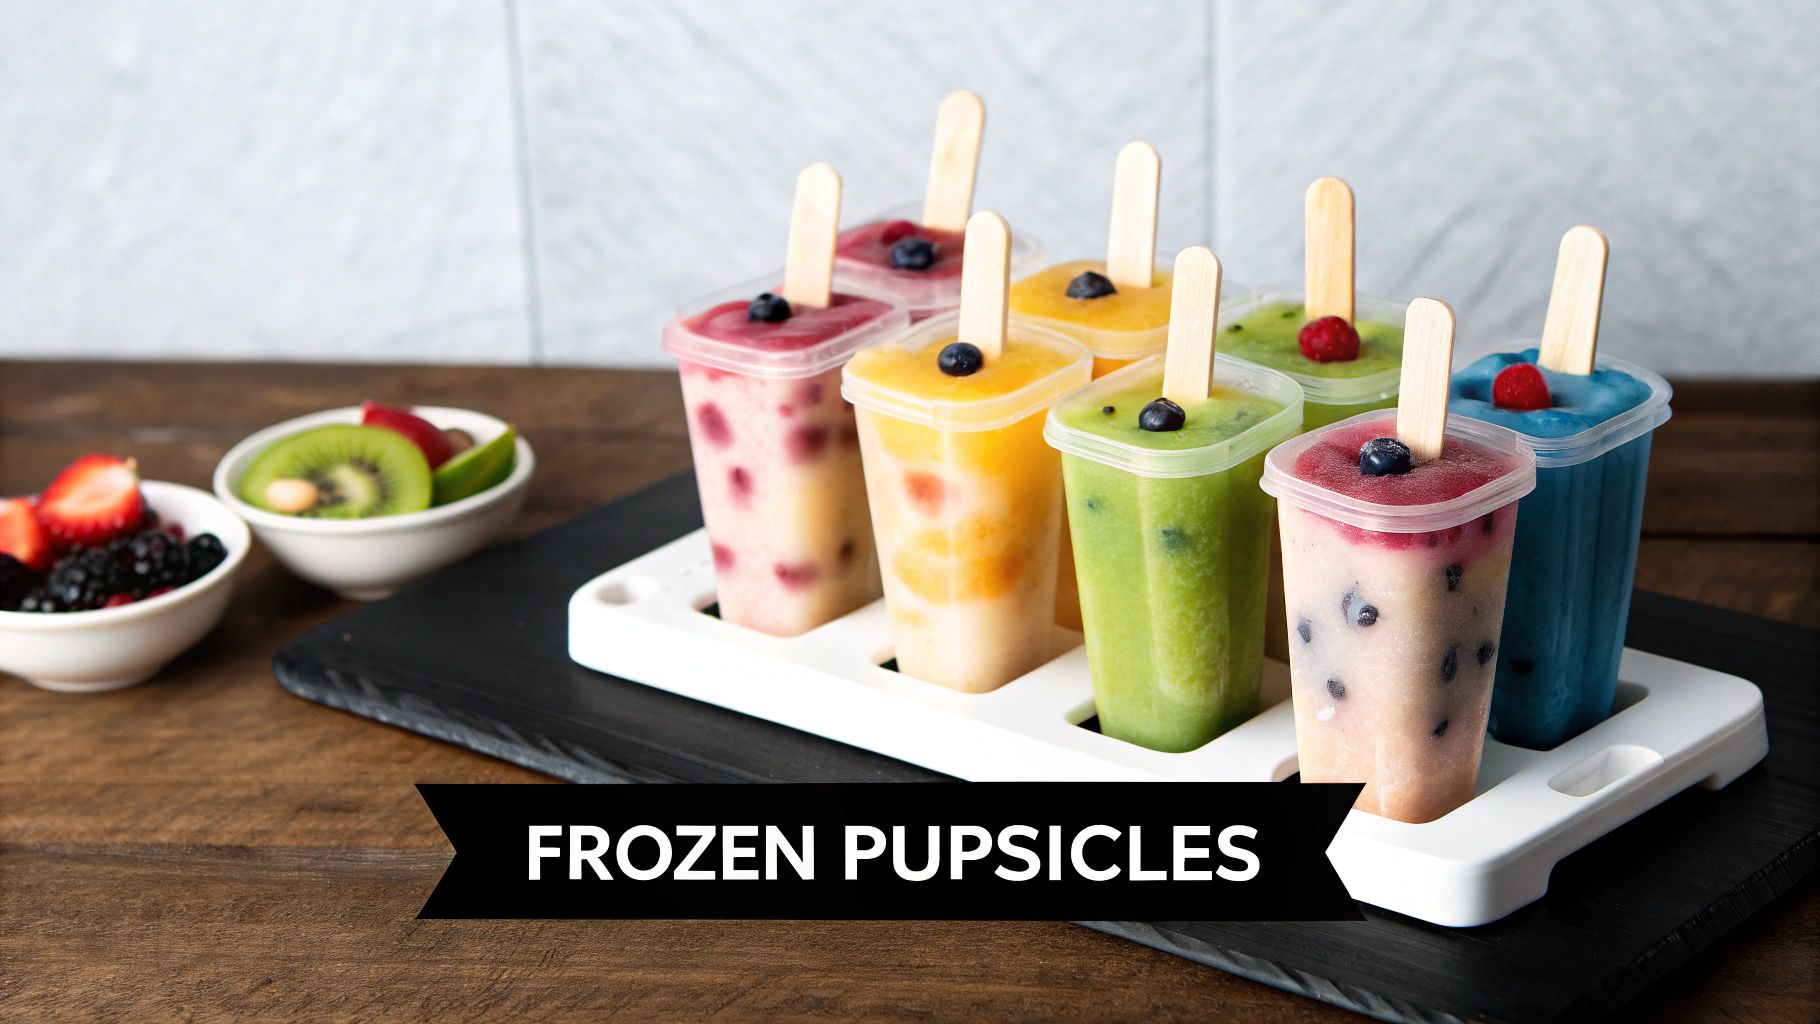
3. Frozen Yogurt Pupsicles
These no-bake frozen treats are the ultimate solution for keeping your dog cool, hydrated, and happy on warm days. The recipe combines probiotic-rich plain yogurt with dog-safe fruits or vegetables, creating a refreshing snack that supports digestive health. Its simplicity and customizability make it an ideal choice among homemade dog treats recipes for pet owners of all skill levels.
This treat’s popularity has soared, becoming a social media sensation with hashtags like #dogsicles and a staple on platforms like BuzzFeed’s Tasty Pets channel. Its benefits are recognized by organizations like the ASPCA, which recommends frozen treats for summer pet safety. The cooling texture is also excellent for soothing the gums of teething puppies, and dog daycare facilities often use them for enrichment, proving their widespread appeal and practical benefits.
Actionable Tips for Perfect Pupsicles
To create delicious and engaging Frozen Yogurt Pupsicles, consider these specific tips:
- Yogurt Choice: Use plain Greek yogurt for a thicker consistency and an extra boost of protein. Always ensure the yogurt you choose is free of xylitol and artificial sweeteners.
- Surprise Center: For added enrichment, place a small piece of kibble, a blueberry, or a dog-safe treat in the center of the mold before freezing. This creates an exciting surprise for your pup to discover.
- Mess Management: These treats can get messy as they melt. Serve them to your dog outside, in their crate, or on an easily washable surface like a tile floor or a lick mat to contain the mess.
- Flavor Boost: Mix a tablespoon of xylitol-free peanut butter or pumpkin puree into the yogurt base for extra flavor and nutrients that dogs love.
Storing for Freshness
Proper storage is simple for these frozen delights. Keep the pupsicles in their molds or transfer them to a freezer-safe, airtight bag or container. They will remain fresh and ready to serve for up to three months in the freezer. This long shelf life allows you to make a large batch at once, ensuring you always have a healthy, cooling treat available for your furry companion whenever the temperature rises.
4. Pumpkin & Oat Dog Cookies
This wholesome, autumn-inspired treat is perfect for dogs needing a little digestive support. Combining the gentle benefits of pure pumpkin puree with the hearty texture of oats, these soft-baked cookies are a nutritious and comforting snack. The recipe is a favorite for pet owners looking for homemade dog treats recipes that are both simple and beneficial, offering a fiber-rich option that aids in regulating a dog’s digestive system.
The appeal of this recipe lies in its gentle, gut-friendly ingredients. Veterinarians often recommend pumpkin for dogs experiencing digestive upset, making these cookies more than just a treat. Their popularity is highlighted by features on lifestyle platforms like Rachel Ray’s ‘Nutrish’ blog and their seasonal appearance in specialty pet aisles. Animal shelters have also been known to use similar pumpkin-based treats to help soothe anxious dogs with sensitive stomachs.
Actionable Tips for Perfect Cookies
To ensure your Pumpkin & Oat Dog Cookies are a delicious success, follow these specific tips:
- Choose the Right Pumpkin: Always use 100% pure canned pumpkin puree, not pumpkin pie mix. The pie filling contains added sugars and spices like nutmeg, which can be harmful to dogs.
- Dough Consistency: The moisture in pumpkin can make the dough sticky. If it’s too wet to handle, gradually add a tablespoon of oats at a time until it’s firm enough to roll out easily.
- Achieve a Softer Bake: For a chewier cookie that’s ideal for senior dogs or those with dental issues, bake at a lower temperature, around 300°F (150°C), for a slightly longer time.
- Spice Safely: A small pinch of cinnamon can add a wonderful aroma and has anti-inflammatory properties. Completely avoid nutmeg, as it is toxic to dogs.
Storing for Freshness
Due to their higher moisture content, proper storage is key to preventing these cookies from spoiling. Store them in an airtight container in the refrigerator for up to two weeks. For longer-term storage, they freeze exceptionally well. Place them in a single layer on a baking sheet to freeze, then transfer to a freezer-safe bag. They can be stored in the freezer for up to three months. These treats are great for all dogs, but it’s important to remember that portion control is a key part of taking care of larger breeds of dogs to manage their weight.
5. Apple Cinnamon Training Treats
These bite-sized soft treats are specifically designed for training sessions. Made with grated fresh apples, a touch of cinnamon, whole wheat flour, and eggs, they are aromatic and highly motivating. The recipe yields small, chewy morsels that are quick for a dog to eat, making them perfect for positive reinforcement without disrupting the flow of training. Their pea-sized form is ideal for delivering multiple rewards without the risk of overfeeding.
The value of this recipe is recognized by top-tier dog training professionals. It’s the kind of high-value, low-calorie reward recommended by renowned trainer Zak George on his popular YouTube channel and is conceptually similar to treats used in AKC training programs. Esteemed sources like “The Art of Raising a Puppy” by the Monks of New Skete also advocate for small, enticing treats, and this apple cinnamon recipe fits that philosophy perfectly, making it a staple in puppy kindergarten classes nationwide.
Actionable Tips for Perfect Training Treats
To create effective and safe Apple Cinnamon Training Treats, follow these specific tips:
- Safety First: Thoroughly core and peel the apples to ensure no seeds or stems are included. Apple seeds contain trace amounts of cyanide, which can be harmful to dogs if ingested in quantity.
- Size Matters: Use a pizza cutter or a bench scraper to quickly and easily slice the soft dough into tiny, uniform squares before baking. This ensures a consistent size perfect for rapid-fire rewarding.
- Texture Control: For a softer, chewier texture that is more palatable for some dogs, bake the treats slightly underdone. A softer treat is also easier for dogs to swallow quickly during a training session.
- Prevent Sticking: Always bake these treats on parchment paper to prevent them from sticking to the baking sheet. When storing, you can also place a sheet of parchment between layers to keep them from clumping together.
Storing for Freshness
Proper storage is key to maintaining the soft texture of these training treats. Due to their higher moisture content, they should be stored in an airtight container in the refrigerator for up to two weeks. For long-term use, freezing is the best option. Spread the treats on a baking sheet to flash-freeze them individually before transferring them to a freezer-safe bag. This method prevents them from sticking together and allows you to grab a small handful for your next training session as needed. They can be stored in the freezer for up to three months.
6. Chicken Jerky Strips
This single-ingredient recipe offers a protein-packed, chewy treat that dogs find irresistible. By slowly dehydrating thinly sliced chicken breast, you create a safe and delicious homemade alternative to commercial chicken jerky, some of which have been subject to safety recalls. The process preserves the natural flavor and nutrients of the chicken without any additives, making it an excellent choice for a high-value training reward.
The popularity of this recipe is rooted in its simplicity and health benefits, especially for dogs with sensitivities. It is naturally grain-free, gluten-free, and ideal for pets on limited-ingredient diets. As a testament to its safety and nutritional value, homemade chicken jerky is frequently recommended by holistic veterinarians and has been featured in publications like Dogs Naturally Magazine. It is also a favorite among show dog handlers who need a potent and healthy motivator.
Actionable Tips for Perfect Jerky
To ensure your homemade chicken jerky is both safe and delicious, follow these specific tips:
- Prep the Chicken: For easier slicing, partially freeze the chicken breast for about 30-60 minutes. Slice the meat against the grain into uniform strips, about 1/8 to 1/4-inch thick.
- Remove Excess Moisture: Before placing the strips in the dehydrator or oven, pat them thoroughly dry with paper towels. This step is crucial for achieving the perfect chewy texture and helps speed up the drying time.
- Safe Dehydration Temperatures: For food safety, start the dehydration process at a higher temperature. Set your dehydrator or oven to 165°F for the first 30-60 minutes to kill any potential bacteria, then reduce the heat to 145°F to finish the drying process, which can take 4-8 hours.
- Check for Doneness: The jerky is ready when it is dry and leathery. A finished piece should bend and crack slightly but not snap in two. If it breaks easily, it’s over-dried; if it’s too soft, it needs more time.
Storing for Freshness
Proper storage is key to preventing mold and maintaining freshness. Once the jerky strips have cooled completely, place them in an airtight container or a zip-top bag. For best results, add a food-safe moisture absorber packet to the container. The jerky can be stored at room temperature for up to two weeks or in the refrigerator for up to a month. For long-term storage, freeze the strips for up to six months. Just as you care for their diet, remember that regular care routines are vital; you can learn some great grooming tips to get your pet ready for spring to complement their healthy lifestyle.
7. Carrot & Parsley Dental Chews
This recipe offers a fantastic, all-natural solution for supporting your dog’s dental health. By combining the abrasive texture of grated carrots with the breath-freshening power of fresh parsley, these dental chews help to scrub away plaque and combat bad breath with every bite. The inclusion of coconut oil adds healthy fats and antimicrobial properties, making these treats a powerful part of a dental care routine.
The concept is inspired by the effectiveness of commercial dental treats like Greenies but uses simple, whole-food ingredients you likely already have. This homemade dog treats recipe has gained traction among holistic pet communities and is often recommended by veterinary dental specialists as a supplement to regular brushing. Its dual-action approach of cleaning teeth and freshening breath makes it an incredibly popular choice for health-conscious pet owners.
Actionable Tips for Perfect Dental Chews
To maximize the dental benefits of your Carrot & Parsley Dental Chews, follow these specific tips:
- Choose the Right Herb: Use fresh, flat-leaf parsley for the best breath-freshening results. Avoid dried parsley or mixed greens, as they lack the same potent chlorophyll content. Limit the amount to 1-2 tablespoons per batch to ensure it’s both safe and effective.
- Maximize the Crunch: The key to a good dental chew is its hardness. Bake these treats until they are completely hard and dry. This ensures they don’t crumble immediately and provides the necessary abrasive action to help clean your dog’s teeth.
- Add Texture: When shaping the dough, press down with the tines of a fork to create ridges. These extra grooves and edges provide more surface area to scrape against teeth, enhancing the plaque-removing benefit.
Storing for Freshness
Proper storage is essential to maintain the hard, crunchy texture required for these dental chews. After they have cooled completely, store them in a breathable container, like a cookie jar with a loose lid or a paper bag, at room temperature for up to two weeks. Avoid airtight containers, as they can trap residual moisture and soften the treats, reducing their dental cleaning effectiveness. For a comprehensive approach to your pup’s well-being, pair these treats with regular exercise and a balanced diet.
Comparison of 7 Homemade Dog Treat Recipes
| Treat Name | Implementation Complexity 🔄 | Resource Requirements ⚡ | Expected Outcomes 📊 | Ideal Use Cases 💡 | Key Advantages ⭐ |
|---|---|---|---|---|---|
| Peanut Butter & Banana Dog Biscuits | Moderate: requires mixing, shaping, and baking (~40 min) | Basic pantry ingredients (4-5), oven needed | Nutritious crunchy biscuits high in protein & potassium; shelf-stable 2-3 weeks | Everyday treats, homemade crunchy biscuits | Affordable, natural ingredients, customizable texture |
| Sweet Potato Chews | Low to Moderate: requires slicing and long dehydration (3-6 hrs) | Single ingredient, oven or dehydrator | Chewy, grain-free chews promoting dental & digestive health | Sensitive stomachs, low-fat treat, dental chews | Hypoallergenic, rich in vitamins/fiber, simple process |
| Frozen Yogurt Pupsicles | Low: simple mixing and freezing (10 min prep + 4-6 hrs freeze) | Yogurt, dog-safe fruits, molds, freezer | Cooling probiotic-rich frozen treats for hydration & digestion | Hot weather refreshment, teething puppies | Quick prep, probiotic benefits, customizable flavors |
| Pumpkin & Oat Dog Cookies | Moderate: baking soft cookies (~40 min total) | Pumpkin puree, oats, flour, eggs | Soft, high-fiber treats aiding digestion, gentle on teeth | Senior dogs, puppies, dogs with digestive issues | Digestive health support, nutritious, gentle texture |
| Apple Cinnamon Training Treats | Moderate: baking plus cutting into tiny pieces (~45 min total) | Apples, cinnamon, flour, eggs | Small, low-calorie treats suitable for frequent training rewards | Training sessions, puppies, food-motivated dogs | Highly motivating aroma, perfect training portion size |
| Chicken Jerky Strips | High: long dehydration (4-8 hrs), food safety required | Single-ingredient chicken, dehydrator/oven | High-protein chewy treats, grain/gluten-free, long shelf life | High-value training rewards, protein-rich diets | Very high value, hypoallergenic, supports muscle health |
| Carrot & Parsley Dental Chews | Moderate to High: mixing, shaping, baking 30-40 min | Fresh parsley, carrots, flour, coconut oil | Crunchy dental chews that freshen breath and reduce plaque | Adult dogs needing dental care and breath freshening | Dental benefits, natural breath freshener, vitamin-rich |
Get Baking and Start Treating Your Best Friend
You’ve just explored a fantastic collection of seven diverse and delicious homemade dog treats recipes, equipping you with the knowledge and confidence to become your dog’s personal baker. From the classic comfort of Peanut Butter & Banana Dog Biscuits to the simple, single-ingredient goodness of Sweet Potato Chews, you now have a versatile menu to choose from. This journey through our curated recipes shows that creating wholesome, tail-wag-worthy snacks is not only possible but also incredibly rewarding.
The true value in making your own treats lies in the complete control you have over the ingredients. You can cater to your dog’s specific tastes, manage dietary restrictions, and avoid the unnecessary preservatives, fillers, and artificial additives often found in store-bought options. Whether you’re whipping up a batch of Pumpkin & Oat Dog Cookies for a sensitive tummy or creating Carrot & Parsley Dental Chews to support oral health, you are providing a snack that is both a treat and a benefit.
Your Next Steps in Canine Confectionery
Feeling inspired? It’s time to preheat your oven and put these ideas into action. Here’s a simple plan to get you started on your baking adventure:
- Choose Your First Recipe: Start with a recipe that seems most appealing and manageable. If you’re short on time, the Frozen Yogurt Pupsicles require minimal prep. If you’re ready for a baking project, the Apple Cinnamon Training Treats are a perfect choice.
- Check Your Pantry: Review the ingredient list and gather your supplies. Remember our tips on ingredient safety, such as using xylitol-free peanut butter and ensuring all components are dog-friendly.
- Involve Your Pup (Safely): Let your dog be your official taste-tester! Baking for your pet is a powerful bonding activity. The sounds and smells from the kitchen will create a sense of excitement and anticipation that strengthens your connection.
- Store Properly: Pay close attention to the storage instructions for each recipe to maintain freshness and safety. Proper storage ensures your hard work doesn’t go to waste and your pup has delicious treats to enjoy for days.
Ultimately, mastering these homemade dog treats recipes is about more than just food; it’s an expression of love. You’re investing your time and effort to enhance your dog’s well-being and happiness. Each biscuit you bake and every jerky strip you dehydrate is a testament to the special bond you share. So, embrace the process, enjoy the creativity, and get ready for the most grateful, drool-filled thank yous from your furry best friend.
For more heartwarming stories and products that celebrate the incredible bond between humans and their dogs, explore the world of Setterfrens LLC. Our beautifully illustrated children’s books and merchandise are inspired by the joy that dogs bring into our lives, making them the perfect companion to your new baking hobby. Discover our collection at Setterfrens LLC.
Article created using Outrank